As you might have already read on the Shopify website, checkout.liquid is deprecated and stores need to upgrade to Checkout Extensibility by August 13, 2024. So here is an example of how to build a Checkout UI extension.
For this example, our requirement is going to be to provide a free item (e.g. t-shirt) on checkout when the total purchase is greater than a thousand. Clear enough?
Checkout UI Extension Setup
If you have read my past blogs then you probably already have a development store and partner account. In any case, these are the prerequisites:
- A Shopify Partner account
- A development store that use the Checkout and Customer Accounts Extensibiliy
- Shopify CLI
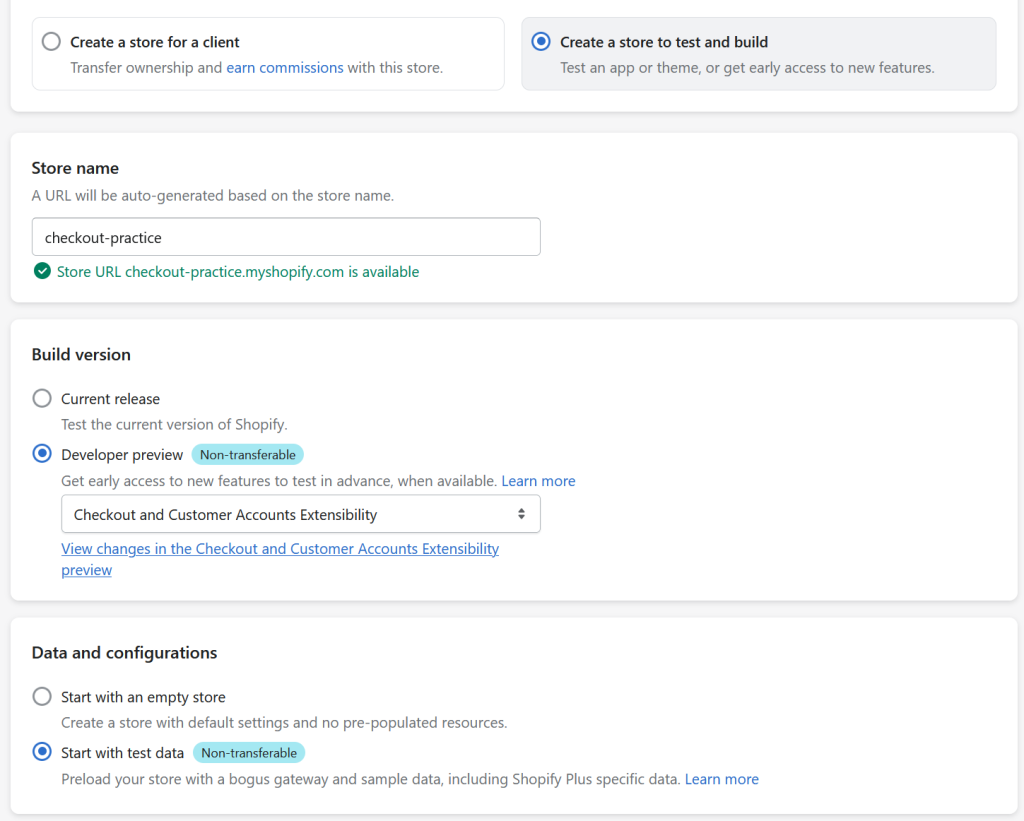
This example was created on a Windows 11 machine with Node v20.11.0, npm v10.2.4 and Shopify CLI v3.60.1. For the final check, on the bottom left of your Shopify Admin page, it should say Checkout and Customer Accounts Extensibility as shown below.

Checkout UI Extension Scaffolding
Super simple, run shopify app init to create you project. You can choose what name you like for your project. In this example, our project name is checkout-practice-app
C:\shopify>shopify app init

Welcome. Let’s get started by naming your app project. You can change it later.

?  Your project name?
√  checkout-practice-app

?  Get started building your app:
√  Start by adding your first extension

╭─ info ─────────────────────────────────────────────────────────────────────────╮
│                                                                                │
│  Initializing project with `npm`                                               │
│  Use the `--package-manager` flag to select a different package manager.       │
│                                                                                │
╰────────────────────────────────────────────────────────────────────────────────╯


╭─ success ──────────────────────────────────────────────────────────────────────╮
│                                                                                │
│  checkout-practice-app is ready for you to build!                              │
│                                                                                │
│  Next steps                                                                    │
│    • Run `cd checkout-practice-app`                                            │
│    • For extensions, run `shopify app generate extension`                      │
│    • To see your app, run `shopify app dev`                                    │
│                                                                                │
│  Reference                                                                     │
│    • Shopify docs [1]                                                          │
│    • For an overview of commands, run `shopify app --help`                     │
│                                                                                │
╰────────────────────────────────────────────────────────────────────────────────╯
[1] https://shopify.devCheckout UI Extension App
Next step is to create the checkout UI extension. This is the code that will modify the checkout page. Change to you project directory and run npm run generate extension. You can choose what technology stack you’ld like to work in. I have chosen JavaScript React for this example.
C:\shopify\checkout-practice-app>npm run generate extension

> checkout-practice-app@1.0.0 generate
> shopify app generate extension


Before proceeding, your project needs to be associated with an app.

?  Create this project as a new app on Shopify?
√  Yes, create it as a new app

?  App name:
√  checkout-practice-app

╭─ info ─────────────────────────────────────────────────────────────────────────╮
│                                                                                │
│  Using shopify.app.toml:                                                       │
│                                                                                │
│    • Org:             Joel Patrick Llosa                                       │
│    • App:             checkout-practice-app                                    │
│                                                                                │
│   You can pass `--reset` to your command to reset your app configuration.      │
│                                                                                │
╰────────────────────────────────────────────────────────────────────────────────╯

?  Type of extension?
√  Checkout UI

?  Name your extension:
√  free-shirt-1000

?  What would you like to work in?
√  JavaScript React


╭─ success ──────────────────────────────────────────────────────────────────────╮
│                                                                                │
│  Your extension was created in extensions/free-shirt-1000.                     │
│                                                                                │
│  Next steps                                                                    │
│    • To preview this extension along with the rest of the project, run `npm    │
│      run shopify app dev`                                                      │
│                                                                                │
│  Reference                                                                     │
│    • For more details, see the docs [1]                                        │
│                                                                                │
╰────────────────────────────────────────────────────────────────────────────────╯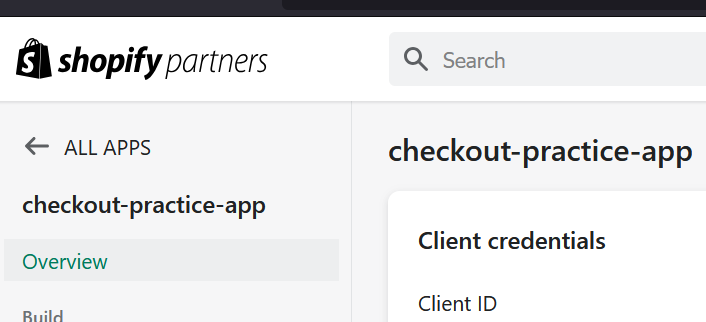
[1] https://shopify.dev/api/checkout-extensions/checkout/configurationTake a look at your Shopify Partners portal page and your app should be there.
Checkout UI Extension Logic
Checkout.jsx
import {
  BlockLayout,
  InlineLayout,
  Text,
  useTranslate,
  reactExtension,
  useSettings,
  useSubtotalAmount,
} from '@shopify/ui-extensions-react/checkout';

export default reactExtension(
  'purchase.checkout.cart-line-list.render-after',
  () => <Extension />,
);

function Extension() {
  const translate = useTranslate();
  const { freebie_title: freeItem } = useSettings();
  const { amount } = useSubtotalAmount();

  if (freeItem && amount > 1000) {
    return (
      <InlineLayout columns={['fill', '20%']}>
          <Text>{ freeItem }</Text>
          <BlockLayout inlineAlignment="end">
              <Text>Free</Text>
          </BlockLayout>
      </InlineLayout>
    );
  }
}What does this piece of code do? This UI extension targets purchase.checkout.cart-line-list.render-after. Which means this UI will be inserted at that target location. It will be rendered after all line items.
Moving along, we use 3 APIs provided by Shopify. The useTranslate hook returns the I18nTranslate interface used to translate strings. We can do something like <Text>{translate('welcome')}</Text> which pulls the welcome message in en.default.json and renders it in a Text component. But we won’t be using it in this example.
The useSettings hook returns the settings values defined by the merchant for the extension. These settings values are found on shopify.extension.toml. The value of the key freebie_title is then assigned to freeItem. We can set the value in the customize mode of the checkout page which is driven by the below extension settings.
shopify.extension.toml
...snipped...

[extensions.settings]
  [[extensions.settings.fields]]
    key = "freebie_title"
    type = "single_line_text_field"
    name = "Freebie title"
description = "Free item name"The useSubtotalAmount API returns a Money value representing the subtotal value of the items in the cart at the current step of checkout. Obviously we’ll need the amount to check if it more than a thousand so we can render the free item. So if there is a free item set and the sub total is more than a thousand we render the free item using Shopify provided React components. This ends the coding part.
Running and Customizing the App
Time to run the app. Execute npm run dev and follow the instructions (e.g. “P” to preview in your browser).
C:\shopify\checkout-practice-app>npm run dev

> checkout-practice-app@1.0.0 dev
> shopify app dev

?  Which store would you like to use to view your project?
√  checkout-practice

╭─ info ─────────────────────────────────────────────────────────────────────────╮
│                                                                                │
│  Using shopify.app.toml:                                                       │
│                                                                                │
│    • Org:             Joel Patrick Llosa                                       │
│    • App:             checkout-practice-app                                    │
│    • Dev store:       checkout-practice.myshopify.com                          │
│    • Update URLs:     Not yet configured                                       │
│                                                                                │
│   You can pass `--reset` to your command to reset your app configuration.      │
│                                                                                │
╰────────────────────────────────────────────────────────────────────────────────╯

✔ Created extension free-shirt-1000.
07:43:25 │ graphiql   │ GraphiQL server started on port 3457
07:43:25 │ extensions │ Bundling UI extension free-shirt-1000...
07:43:25 │ extensions │ Parsed locales for extension free-shirt-1000 at
C:/shopify/checkout-practice-app/extensions/free-shirt-1000
07:43:25 │ extensions │ free-shirt-1000 successfully built
07:43:25 │ extensions │ Parsed locales for extension free-shirt-1000 at
C:/shopify/checkout-practice-app/extensions/free-shirt-1000
07:43:27 │ extensions │ Draft updated successfully for extension: free-shirt-1000

────────────────────────────────────────────────────────────────────────────────────────────────────────────────────────────
› Press d │ toggle development store preview: ✔ on
› Press g │ open GraphiQL (Admin API) in your browser
› Press p │ preview in your browser
› Press q │ quit

Preview URL: https://damaged-breakfast-campus-syria.trycloudflare.com/extensions/dev-console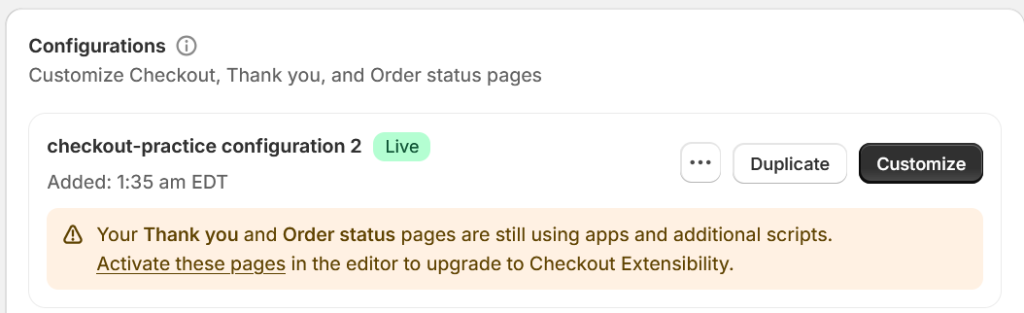
GraphiQL URL: http://localhost:3457/graphiqlBefore we can see our app in action, we need to do some bits and bobs. Go to Settings > Checkout > Customize to add the app block.
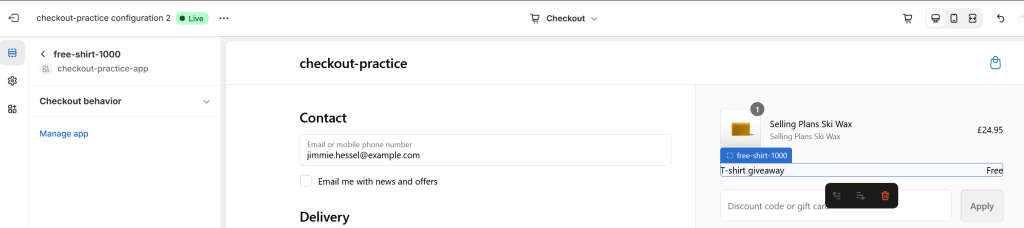
Add app block. Can you see the free-shirt-1000 extension?
App block added. Can you see it below the line items?
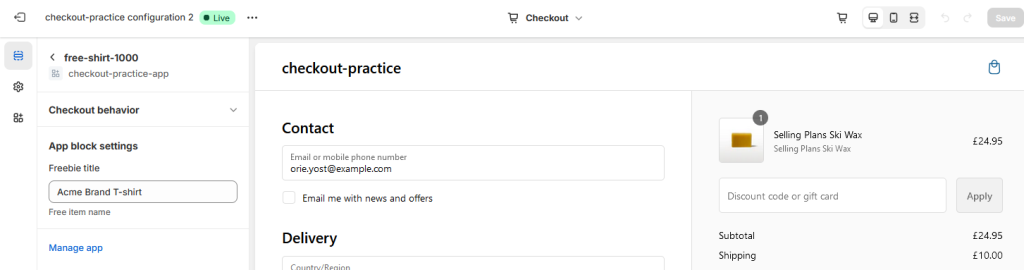
App block settings. Does it remind you of the extension settings in shopify.extension.toml? We’re giving away an Acme Brand T-shirt for purchases over a thousand.
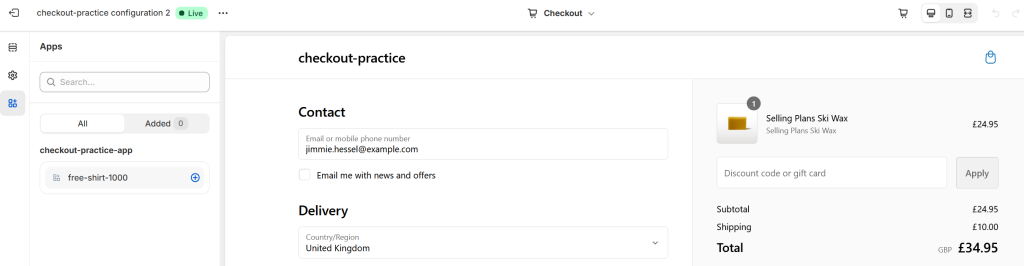
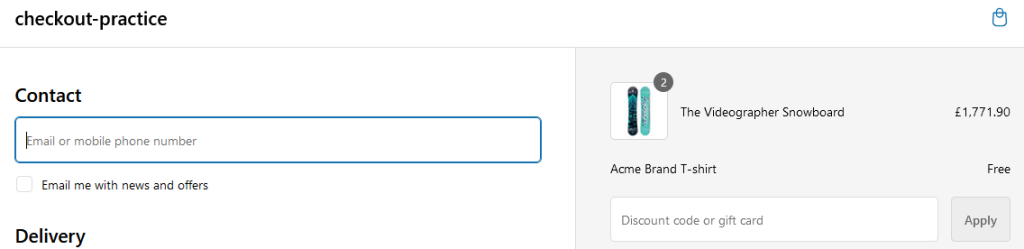
Now, go purchase something over a thousand and go to checkout. You should have something like below.
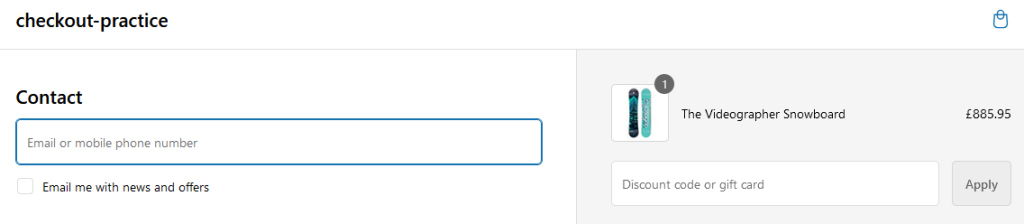
Try buying something that’s below a thousand and go to checkout. You are not getting a free item.
Shopify Checkout UI Extension Summary
There you have it. Your first Shopify Checkout UI Extension. To recap, create the scaffolding using Shopify CLI. After that is in place generate an extension. Choose a target location in the checkout page and add your custom logic. Last bit is doing some bit of config to render your UI extension. Good luck creating your own Shopify Checkout UI Extension in the future. Grab the repo here, github.com/jpllosa/checkout-practice-app.
Leave a Reply